

AutoCasperNBI is an app that automates the creation of NetBoot Images (read: NBI’s) for use with Casper Imaging.
AutoCasperNBI is designed to cut down on the faff associated with creating NBI’s, by not only by allowing you to create NBI’s on a different OS version. But by also saving your settings for when you next run the tool.
This page is the help guide for AutoCasperNBI. To download the latest version of the app & to view the source, click the button below.
Contents
- 1 Prerequisites
- 2 On Launch
- 3 JSS URL
- 4 NetBoot Required Settings
- 5 Options
- 6 Options – Always Set
- 6.1 Reduces Kernel Cache if a 10.9.x NBI:
- 6.2 Suppresses Apple/iCloud & Diagnostics Setup Assistants:
- 6.3 Creates & Auto logs in as Root:
- 6.4 Disable Screen Saver for Root account:
- 6.5 Deletes com.apple.dockfixup.plist:
- 6.6 Creates A Minimal Dock for Root Account:
- 6.7 Copies Casper Imaging to the NBI’s Applications Folder:
- 6.8 Launches Casper Imaging At Login:
- 6.9 Enables Casper Imaging’s debug mode:
- 6.10 Removes Casper Imaging’s Quarantine Flag:
- 6.11 Import JSS CA Certificate & Trusts As Root:
- 6.12 Enable Invalid JSS Cert (if a JSS URL is given):
- 6.13 Disables App Nap:
- 6.14 Disables Software Update:
- 6.15 Disables Spotlight:
- 6.16 Disables TimeMachine prompts:
- 6.17 Disables Gatekeeper:
- 6.18 Enables Disk Utilities Debug Menu:
- 6.19 Enables Diskless NetBoot:
- 6.20 Expands NetBoot Image to 64GB:
- 6.21 Compacts NetBoot Image:
- 6.22 Renames Sparseimage to DMG for hosting on NetSUS:
- 7 Options – Standard
- 8 Options – Advanced
- 9 Options – Additionals
- 10 Administrative Privileges
- 11
- 12 NBImageInfo.plist
- 13 NBI Folder Location
- 14 Space Needed
- 15 Building The NBI
- 16 Read-Only DMG
- 17 Logging
- 18 Updating
- 19 Issues
- 20 Secret Sauce
Prerequisites
AutoCasperNBI’s goal is to automate the NBI creation process, this will do you little good if you do not have the following things in place;
NetBoot Server Connectivity
Your mac clients need to be able to see you NetBoot server & any NBI’s hosted on it. These images can be seen via the Startup Disk pref pane:
 Or via Boot Picker which is accessed by holding the Option key on startup.
This can be tested by creating a vanilla NetBoot Image via System Image Utility, once created upload it to your NetBoot server of choice.
OS.dmg
NBI’s created with AutoCasperNBI really should be created from a clean never booted Operating System disk image (read: OS.dmg).
Clean OS.dmg’s can be created via AutoDMG, Casper Admin or Composer (see “Building OS Packages” in the Casper Suite Administrator’s Guide.)
Also, with AutoCasperNBI the OS versions do not have to match. 10.7+ NBI’s can be created on 10.9+ Macs running AutoCasperNBI.
NOTE: Only use Composer in the case of forked builds. That is when Apple releases a “fork” of the OS for a new iteration of hardware.
Troubleshooting the NetBoot Process
If you have any issues in setting this far, the following (despite it’s age) is still the best resource to help you in “Troubleshooting the NetBoot process.” Apple also has some documentation available.
Also, enabling verbose booting on a client can show where in the process things are failing & there can be issues with non-Apple Thunderbolt or USB adaptors as well as model filtering on the NBI’s too.
Lastly, if you are creating NBI’s in an environment where packages used in the imaging process are hosted on a JDS instance, then you will also need to create an AFP share as outlined here.
On Launch

On Launch, AutoCasperNBI’s opens with most options are greyed out, this is by design.
On selecting either, AutoCasperNBI will attempt to get their respective version details.
Once you the version details have been found, the other options will become available.
When selecting an OS.dmg for the 1st time, AutoCasperNBI may appear to “hang” This is as the OS.dmg is silently mounted using hdituil attach. The reason for this can be found in the hdiutil man page: “hdiutil attach attempts to intelligently verify images that contain checksums before attaching them. If hdiutil can write to an image it has verified, attach will store an attribute with the image so that it will not be verified again unless its timestamp changes.”

With both an OS.dmg & Casper Imaging.app selected, the rest of the main window will become available.
The NetBoot Name field will auto populate, in the format of “<OS Version> AutoCasperNBI”, the “NetBoot Image Index” will be set to a random number & the “Serve Image over” options will be shown.
If you now click “Build”, & AutoCasperNBI will start the NBI creation process.
To skip to the build part of this guide, click here.
JSS URL

If you wish to have Casper Imaging auto-populated with a JSS’s details, then enter the full JSS URL in the JSS URL text field.
AutoCasperNBI will try & retrieve the version of the given JSS & will check it’s version against that of the version of Casper Imaging selected earlier.
If there is a minor version difference (for example: 9.1 & 9.2), the AutoCasperNBI will reflect that in it’s wording in the JSS URL box as well as change the indicators on the Casper Imaging & JSS icons to yellow.
Likewise if there is a major version difference (for example: 8.x & 9.x), these indicators will show be red & the wording will warn accordingly.
The rationale is that you may wish to try different minor releases of Casper Imaging when tracking down an imaging issue.
You may also wish to build NBI’s with in advance of performing a major version JSS update.
However, it’s strongly recommend to not put into production NBI’s with major version differences between Casper Imaging & JSS.
NOTE: If you enter a JSS URL, this is written to AutoCasperNBI’s plist for when you next run AutoCasperNBI.
NetBoot Required Settings

NetBoot Name:
AutoCasperNBI will set this field to “<OS version> AutoCasperNBI,” this name is the name of the folder AutoCasperNBI will create for the NBI, as well as the name of the NBI that is shown to clients (except when running NetSUS as this shows as “Faux NetBoot”)
If uploading to a NetSUS, this name cannot contain a space & by enabling “Will be served from a NetSUS appliance” should remove any spaces you have.
NetBoot Image Index:
A NetBoot Images Index (alongside it’s name) is used to identify the NBI to clients & server.
If this NBI is to be hosted on only one server, then the image index will need to be a value between 1-4095. But, if you’re load-balancing the NBI by hosting it on more than one server you’ll need to set a value between 4096-65535.
The value of the index is randomly determined by AutoCasperNBI & is dependent on whether the “Will be served from more than one server” checkbox is enabling.
Serve Image Over:
Depending on your environment, one option may work better than the other. You can select which option to set in the NBI here.
NOTE: The selections made to “Will be served from a NetSUS appliance”, “Will be served from more than one server” & “Serve Image over” are written to AutoCasperNBI’s plist.
Options
Technically, you could just hit the build button & be on your way. But AutoCasperNBI can do much more & does several things in creating an NBI.
Pressing the Options button will open a new tabbed window, each of the Tabs & the options within are discussed in detail below.
Each option also has a Tool Tip which explain their function.
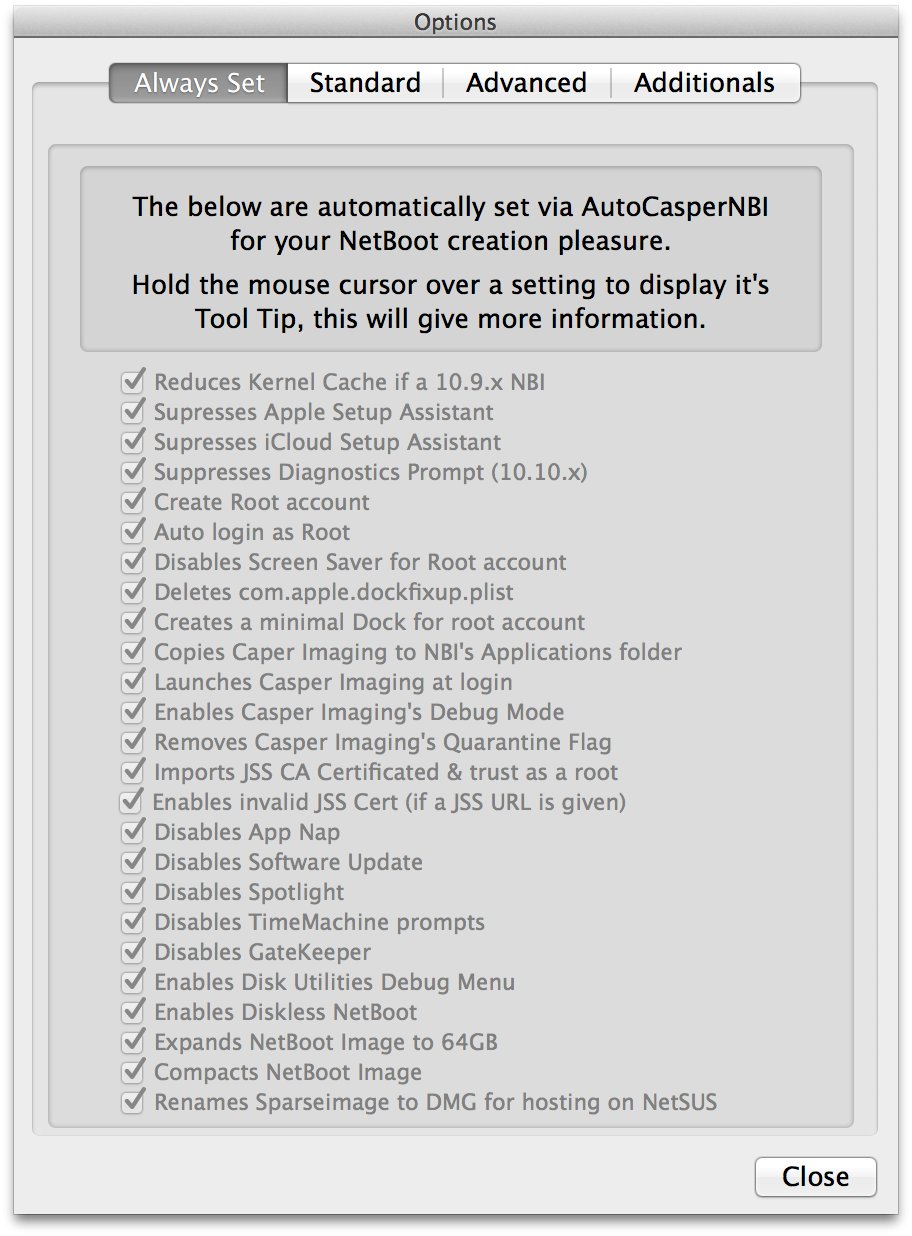
Options – Always Set

Reduces Kernel Cache if a 10.9.x NBI:
When creating NetBoot images on 10.9-10.9.3, older macs would fail to NetBoot due to the kernel cache being over the 32MB limit they had set in TFTP.
TFTP is used during the NetBoot boot process to download the kernel cache, & so older macs would fail to NetBoot.
If a 10.9.x OS.dmg is selected, AutoCasperNBI will remove some unneeded extensions in order to generate a kernel cache that is below 32MB allowing older Macs to NetBoot.
By happy coincidence deleting the same kernel extensions stops an prompt when creating a 10.9.x NBI on 10.10.x as they are unsigned.
Suppresses Apple/iCloud & Diagnostics Setup Assistants:
Ideally the NBI will boot straight into the root user with Casper Imaging running, therefore the Apple, iCloud & Diagnostics setup assistants are suppressed.
Creates & Auto logs in as Root:
AutoCasperNBI will always enable the root user & will auto login as root.
The premise of using Casper Imaging is to semi-automate the imaging process, making it hands off from clicking Casper Imaging’s “Install” button. However, if you’re using Autorun data the imaging process can be fully automated.
If a non-root account is used to login to the NBI, Casper Imaging will prompt every 5 minutes for administrative details, which will somewhat hamper the imaging process.
The root users password is set to: netboot.
If you wish to NOT have root login, you can add a PKG that deletes the file /etc/kcpassword.
Disable Screen Saver for Root account:
As the screen saver being activated can pause some processes, the screensaver is disabled for the root account.
Deletes com.apple.dockfixup.plist:
This plist can add “unwanted” items to the dock, so it’s removed.
Creates A Minimal Dock for Root Account:
The root accounts dock is set to the below.

Copies Casper Imaging to the NBI’s Applications Folder:
The Casper Imaging.app selected earlier is copied into the /Applications folder of the NBI.
Launches Casper Imaging At Login:
A Launch Agent is installed which launches Casper Imaging once logged into the NBI.
This Launch Agent can be found at: /Library/LaunchAgents/com.AutoCasperNBI.CasperImaging.plist
Enables Casper Imaging’s debug mode:
Casper Imaging’s debug mode is enabled by creating a folder called “debug” in Casper Imaging. (Full path is: /Applications/Casper Imaging.app/Contents/Support/debug)
This can be helpful when troubleshooting issues with JAMF Support.
Removes Casper Imaging’s Quarantine Flag:
If the version of Casper Imaging selected is one that has just been download from JAMFNation, it may still have the Quarantine Flag. AutoCasperNBI removes the flag if present.
Import JSS CA Certificate & Trusts As Root:
If you have entered a JSS URL, AutoCasperNBI will download the JSS’s CA cert to the NBI & on launch this cert will be added as a trusted root certificate.
This will mean that the NBI will trust JDS connections without prompting to accept the cert, as the whole trust chain should be on the NBI.
Enable Invalid JSS Cert (if a JSS URL is given):
If a JSS URL is given, AutoCasperNBI will write to Casper Imaging’s plist to enable connection to a JSS with an invalid SSL cert.
Casper Imaging can see a JSS’s certificate being as being invalid either due to them being self-signed, signed by a private CA or if the NBI’s time is not correct.
Disables App Nap:
Similar to the screen saver, App Nap is disabled in case an app is napped.
Disables Software Update:
Software Update is disabled as not needed on an NBI.
Disables Spotlight:
Spotlight indexing can stop a volume from being unmounted, & so Spotlight is disabled.
Disables TimeMachine prompts:
OSX, by default, will ask if you wish to use new disks for TimeMachine backups. This can get boring pretty fast when imaging macs, as you can see the prompt several times. So AutoCasperNBI disables the prompts.
Disables Gatekeeper:
Gatekeeper is “disabled” by setting it to “Allow apps downloaded from anywhere.” This again stops any prompts from interfering with the imaging process.
Enables Disk Utilities Debug Menu:
Disk Utilities Debug menu is enabled, giving access to some more detailed information which can be handy when troubleshooting.
Enables Diskless NetBoot:
NBI’s used for Casper Imaging are required to be diskless, so that the booted Macs HD can be erased or partitioned as needed.
Expands NetBoot Image to 64GB:
The NBI is set to expand up to 64GB, this is to allow for more disk space to be created if needed by applications running on the NBI without expanding on the size used by the NBI.
Compacts NetBoot Image:
To save on disk space used by the NBI itself, the NBI is compacted at the end of the process, so this is after installing any extra Packages etc.
Renames Sparseimage to DMG for hosting on NetSUS:
Currently, NetSUS can only host NBI’s that end .dmg. As such, if the option “Will be served from a NetSUS appliance” is ticked then the NBI’s DMG is renamed.
Options – Standard

Set NetBoot Description:
If selected, AutoCasperNBI will generate a description for the NBI that contains the OS.dmg’s OS & build versions, Casper Imaging’s version, the JSS URL (if supplied), the name of the user that created the NBI & the date of creation.
Reduce Image Size:
Reducing the NBI’s size is not needed, really it’s not.
NetBoot clients will only pull the data required to boot the OS, so starting with a clean OS.dmg will lower what the clients request.
However, AutoCasperNBI can be used to reduce the size of the NBI by checking this box.
The resulting DMG size will vary, but for 10.7-10.9 NBI’s it falls under 8GB, for 10.10 it’s around 8.7GB. This dmg will be named NetBoot.reduced.dmg & will be in the NBI folder.
There is a long list of items that AutoCasperNBI removes, & whilst i’ve not listed them anywhere other than the code, below are the apps & utilities that are left on the NBI post reduction:
/Applications/Casper Imaging.app
/Applications/Launchpad.app
/Applications/Safari.app
/Applications/System Preferences.app
/Applications/TextEdit.app
/Applications/Utilities/Activity Monitor.app
/Applications/Utilities/Console.app
/Applications/Utilities/Disk Utility.app
/Applications/Utilities/Grab.app
/Applications/Utilities/Keychain Access.app
/Applications/Utilities/System Information.app
/Applications/Utilities/Terminal.app
Also, some Preference Panes are removed leaving only the following:
/System/Library/PreferencePanes/DateAndTime.prefPane
/System/Library/PreferencePanes/Network.prefPane
/System/Library/PreferencePanes/SharingPref.prefPane
/System/Library/PreferencePanes/StartupDisk.prefPane
One last point to mention is that the default desktop is also removed when reducing the NBI, this results in a background like the following (note the below has had a custom dock deployed).

Screen Sharing:
One of the benefits of imaging via a NetBoot instead of a NetInstall is that you can remotely connect via screen sharing. This allows you to image macs that are either 1 desk, or 1,000 miles away & review the progress.
Another benefit of NetBoot, is that you can perform some diagnostics when NetBooted, things like repairing permissions etc are possible as you’re not booted to the same volume you’re running the repair on.
If you check “Enable ARD” the username & password you enter are written in plain text to AutoCasperNBI’s plist, but on the NBI itself they are encoded. When the NBI is started up, AutoCasperNBI’s launch daemon runs a script that will create a user with the username & password given & then enables ARD.
When “Enable VNC”, is checked the VNC password is written to the NBI in the following file,
/Library/Preferences/com.apple.VNCSettings.txt this password is obfuscated via a perl command.
This password is again written to AutoCasperNBI’s plist.
Desktop Picture:
Checking this option will replace the default desktop located: /System/Library/CoreServices/DefaultDesktop.jpg with the image you supply.
Nothing is done in regards to resizing etc, so bare that in mind with the image you set.
The path to this image is written to AutoCasperNBI’s plist. On build AutoCasperNBI will check that the image exists, alerting if it cannot be found.
Options – Advanced

NOTE: Anything set in this panel is written to AutoCasperNBI’s plist.
Time Server:
Here you can set the NTP for the NBI to use as well as the timezone.
The “Time Zone” pop up includes the main locations for setting timezones on OSX, it’s not the complete list, but it’s the primary ones. You should be able to find a location appropriate for the timezone you wish to set.
Localisation:
From the “NetBoot Language” pop up includes a list of OSX’s “tier 1 languages” (to quote Apple), the “Input Language” pop up includes all of OSX’s supported input languages.
Create a Restorable DMG:
When this option is checked, AutoCasperNBI will create a second ASR’d read-only DMG in the NBI folder.
This read-only DMG can then be restored to external media, such as a USB stick. This gives you a portable OS from which you can image.
rc.netboot:
By default, NetBoot servers starts to stop allowing clients to boot from them after the 10th or so client has booted.
For several years people have used the following guidance from the University of Utah to modify the rc.netboot file to allow more than 10 clients to boot.
Checking this option replaces the NBI’s standard rc.netboot file with a modified version of the above linked example & was supplied by foigus.
In the beta, one tester managed to boot 35 clients from a single NetBoot server after having replaced the rc.netboot. YMMV however.
Enable Simple Finder:
Simple Finder is a stripped down, simplified version of the Finder. Checking this enables Simple Finder, which results in the Finder behaving such as what’s mentioned here.
Options – Additionals
 NOTE: Anything set in this panel is written to AutoCasperNBI’s plist.
Certificates:
Certificates added here are copied to the following location on the NBI:
/Library/Application Support/AutoCasperNBI/Certificates/
When the NBI is started up, AutoCasperNBI’s launch daemon runs a script that trust as root any certificates found in this location.
Install Additional Packages:
Packages added here, are installed onto the NBI after any items are deleting off the NBI (if reducing), but before the final NetBoot.dmg is created.

On launch & pre-build AutoCasperNBI checks that the selected certificates &/or packages exist.
If any certificates &/or packages cannot be found when the build button is pressed, you’ll receive an alert & the build will stop.
Any that are missing are shown in red under the “Additionals” tab.
If they are missing as you’ve not connect some removable media they were on, reconnect the media & then click the refresh button.
AutoCasperNBI will again check that the items exist & in finding them, will change the text to black.
Administrative Privileges

Administrative privileges are required by AutoCasperNBI in order to build the NBI without prompting for permissions every 5 minutes as per sudoers 5 minute timeout.
AutoCasperNBI caches the entered username & password to variables within AutoCasperNBI & they are not written anywhere.
NBImageInfo.plist
For 10.7-10.10 the PlatformSupport.plist found at: /System/Library/CoreServices/PlatformSupport.plist is used to generate the “DisableSystemIdentifiers” array in the NBImageInfo.plist.
10.11’s PlatformSupport.plist can also be found at: /System/Library/CoreServices/PlatformSupport.plist. But on 10.11 it only contains “SupportedBoardIDs” & not the “SupportedModelProperties” needed to model filter on NetBoot servers such as BSDPy.
When generating a NBI on 10.11 via SIU a private framework included within 10.11 is called to resolve the “SupportedBoardIDs” to “SupportedModelProperties”. However, as AutoCasperNBI & AutoImagrNBI allow for the creation of 10.7+ NBI’s on 10.9+ this private framework cannot be used by either AutoCasperNBI & AutoImagrNBI.
Therefore, within AutoCasperNBI’s & AutoImagrNBI’s /Contents/Resources/ is a folder called “10.11NBImageInfo”
Within which NBImageInfo.plists for each build of 10.11 can be found (these are named per build). Also a NBImageInfo.plist called “Latest.plist”

If an OS.dmg is selected for a build that does not have an NBImageInfo.plist within AutoCasperNBI or AutoImagrNBI, then AutoCasperNBI or AutoImagrNBI will attempt to download the missing NBImageInfo.plist from here.

If the build specific NBImageInfo.plist is found, it will be downloaded to the app bundle for use when creating NBI’s for that build. However, if the build specific NBImageInfo.plist cannot be found or downloaded due to lack of internet connectivity then the “Latest.plist” will be used & a dialog box like the below will be shown:

NBI Folder Location
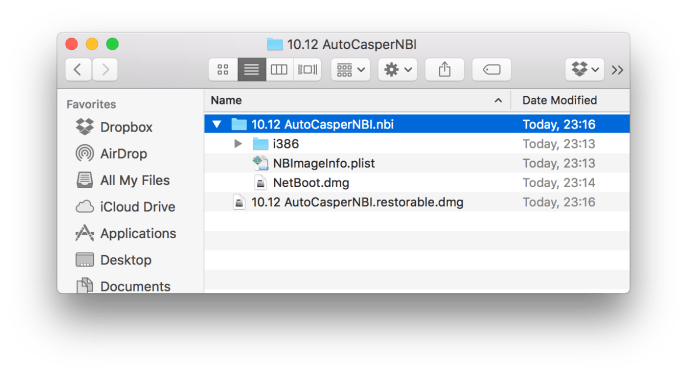
On clicking “Build” AutoCasperNBI will ask for the location to create the NBI’s enclosing folder.
This folder will be named the the same as what you set the NBI name to, & within there will be the .nbi folder for uploading to a NetBoot Server. Also, the .restorable.dmg, will be located in this folder at the same level as the .nbi folder.
Space Needed

With a location selected, AutoCasperNBI checks to make sure there is enough space available to create the NBI.
AutoCasperNBI reads the used space on the OS.dmg, rounds up the used space & then checks the destination to see if we have enough space, erroring if not.
Building The NBI

Once all checks have passed, AutoCasperNBI will close it’s windows & show the progress bar shown above. This gives visible feedback as to the builds progress.
The contents of OS.dmg are copied to a new DMG within the NBI folder. (Well a sparse image which is then renamed dmg).
You may see AutoCasperNBI show as “not responding” during the NBI creation, this is normal & a side affect of writing an app in AppleScript as it’s not able to multiple thread.
During these “hangs” the cogs animation will continue, just leave AutoCasperNBI to do it’s thing.
The NBI creation can take upto 20 minutes on a Mac with an SSD, to 90 minutes if running on a spinning disk.
Once the NBI has been created a few things happen:
- The main window should reappear.
- OSX’s complete notification will sound.
- The progress window will look like the below.

Read-Only DMG
Whilst AutoCasperNBI creates a Read-Write sparseimage, this is renamed from NetBoot.sparseimage to NetBoot.dmg to make sure the resultant NBI is compatible with not only OS X’s NetInstall service, but also BSDPy & NetSUS.
If you wish to make the NBI Read-Write again, rename to NetBoot.sparseimage. Make your changes then rename back to NetBoot.dmg.
Logging

AutoCasperNBI writes it’s logs to ~/Library/Logs/AutoCasperNBI/. These can be quite verbose, but are handy if you need to troubleshoot why AutoCasperNBI is failing to create the NBI or if you just wish to have a nose at what it’s doing.
If you do have any issues, please log them here. You are taken to the same page when you select Help > Log An Issue from the menu bar.
The log can also be accessed when the build has completed or failed by clicking the “Open Log” button.
Updating

AutoCasperNBI checks for updates once a day, if an update is found you’ll will be asked to update.
You can also manually check for updates by clicking AutoCasperNBI > Check For Updates.. from the menubar.
Issues
With any software, there is bound to be some issues. For known issues please see AutoCasperNBI’s read me, to log an issue please visit this page.
AutoCasperNBI will generally error out with a message like the below that has a button that links to the log:
Secret Sauce
AutoCasperNBI & Casper NetInstall Creator leverage the same methods to create NetBoot & NetInstall images as System Image Utility.
These scripts can be found at the following location on 10.9:
/System/Library/CoreServices/System Image Utility.app/Contents/Frameworks/SIUFoundation.framework/Versions/A/XPCServices/com.apple.SIUAgent.xpc/Contents/
Whereas on 10.10 it’s:
/System/Library/CoreServices/Applications/System Image Utility.app/Contents/Frameworks/SIUFoundation.framework/Versions/A/XPCServices/com.apple.SIUAgent.xpc/Contents/Resources/
They are highlighted below.
